First, if you do not know what a Cover page is, please reference What is a Cover Page to find out more about them. Creating a Cover page is much like creating a standard Ploud page in your website with some obvious differences.
Michigan Libraries has developed a tutorial video for Cover Pages.
(12mins) Drag and drop rows and columns to create your own page grid that you can fill with different content types. Allows for greater control of page layout and look and feel opportunities.
Navigate to the folder where you would like to create your Cover Page.
From the Green Edit Bar, Select Add new… and select Cover (
).
In the resulting Page, Enter a Page Title, Summary (Optional), and then Select a Predefined Layout. These layouts will create a page that will have These are the following Layout Options and their row and column layout:
Ploud Banner Layout

Ploud Carousel Page
Ploud Empty Layout
Ploud Layout A
Ploud Layout B
Select the Layout you would like to use and then select the Save Button (in this article we will use the Ploud Banner Layout as an example.
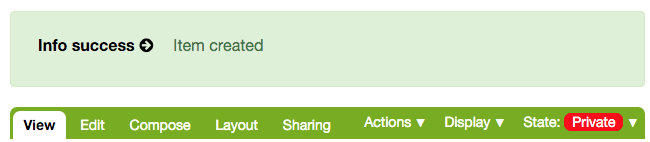
You will be notified on the following page that the Cover page was created and you will also notice, in the Green Edit Bar that there are some new tabs that exist only for Cover Pages. The Compose and Layout tabs are unique to Cover Pages
Lets Layout our Page first by clicking on the Layout tab and you should see something like the following image:
If you are not familiar with the elements on this page, please go to the What is a Cover Page FAQ to learn more about them, then come back to this article.
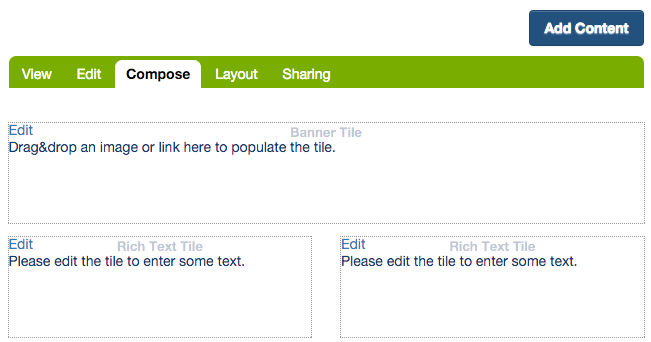
You will notice that the title of the page is called “Export Layout”. This title is not the title of your page but rather the title of this ‘view’ (i.e. Layout View) of the page. Its a bit confusing but we are working on modifying the title to make it more clear.In our example, we used the Ploud Banner Layout and that layout has a predefined configuration using a Banner tile in row one and two Rich Text Tiles in Row two. You can Add Rows and Columns by Dragging and dropping them into a particular row or column. For our example, we will leave the page as is.
Click on the Layout tab within the Green Edit Bar and you will see gear icons next to the tiles, columns and rows that will configure that item. In this case, click on the gear icon within the Banner Tile. We will want to tell the tile how large to display the image we drag onto it.
Within the next window, next to the image field, select the 768:768 value in the pull-down menu:

Click Save.Click on the Compose tab in the Green Edit bar.
The Compose page is where you will create you content for your page.
Let’s put a banner in the Banner Tile. This tile supports dragging and dropping image content into it. Click on the Add Content button (
).
The Cover Content Selector will appear where you can navigate to a particular item to drag into the Banner tile.

When trying to drag and drop an item onto a Tile, the tiles that can accept that type of content will turn blue and then green as you drag the content over them. As you drop content on the proper tiles, the Content is automatically saved for you:

You should see your image in the banner tile area:

You can now customize the rest of your cover page. Click on the View tab to see how your page will look like to your end users. If this page is going to be the default view of a folder or maybe your website, please read this article.


Was this article helpful?
That’s Great!
Thank you for your feedback
Sorry! We couldn't be helpful
Thank you for your feedback
Feedback sent
We appreciate your effort and will try to fix the article